Removing duplicates in Excel allows you to quickly eliminate redundant or repeated values from your dataset. This feature is useful when you have a large list or table with duplicate entries and you want to clean up the data or extract unique values.
How to Remove Duplicates in Excel?
1. Select the range of cells that you want to remove duplicates from. You can click and drag your mouse to select multiple cells, or you can press Ctrl+A to select the entire worksheet.
2. Go to the “Data” tab in the Excel ribbon. In the “Data Tools” group, you’ll find the “Remove Duplicates” button.
3. Click on the “Remove Duplicates” button. The “Remove Duplicates” dialog box will appear.

4. By default, Excel selects all columns in the selected range. If you want to remove duplicates based on specific columns, uncheck the columns that you don’t want to include in the duplicate removal process.
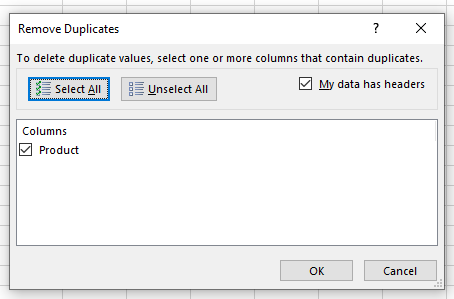
If you have headers in your data, make sure to check the “My data has headers” option in the “Remove Duplicates” dialog box. This ensures that Excel includes the header row when checking for duplicates.
5. Click the “OK” button to remove the duplicates. Excel will scan the selected range and remove any duplicate values, keeping only the unique values.
A dialog box will appear, indicating the number of duplicate values found and the number of unique values remaining.

Excel will delete the duplicate values from the selected range, leaving only the unique values intact.
when removing duplicates, Excel considers the entire row and not just individual cells. This means that if two rows have identical values in all columns, Excel will treat them as duplicates and remove one of them.
Removing duplicates in Excel helps you maintain clean and accurate data by eliminating redundant entries. It simplifies data analysis and ensures that you’re working with unique values for more accurate insights and calculations.